Finally got around to trying out these new stopper kits. The Lee Valley stoppers came with nothing, so I was kind of flying blind. These new ones came with a proper mandrel and drill bit, so no centering issues. The wood is pau ferro, which I love, but I’ve not too much left now. Should be enough for a few more stoppers though.
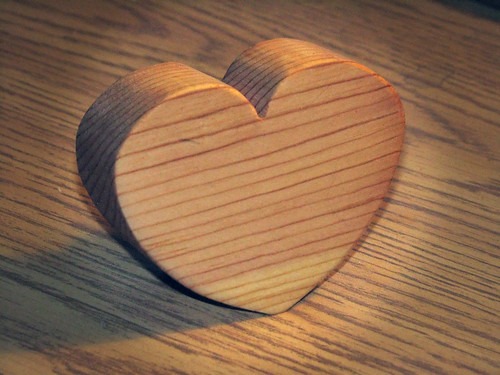
Valentine Heart
I wanted to whip up a little something in the shop for the Love Of My Life, but I needed something I could build quickly, since the shop is freezing. This is what I came up with.
It’s made from the last bit of naughty pine — sorry, KNOTTY pine — from the Step Stool project. I freehand drew half a heart onto a scrap of plywood, cut it at the bandsaw, cleaned up the edge with the sanding drum, then drew the outline onto the workpiece, flipping the template for the other half to ensure symmetry. Back to the bandsaw to cut the final shape, back to the sanding drum to clean up edges. Hand sanded the inside of the curves at the top where the sanding drum can’t reach.
Finally, I laid out a line that would cut off enough of the bottom to allow it stand on its own, but at an angle so that the front is intact, retaining the full heart shape. To make the cut, I taped the heart to a wedge-shaped scrap that happened to be the right angle and took it to the bandsaw. Final sanding, quick coat of mineral oil, and back inside to thaw out my hands…
Lynda loved it. Yay!
Step Stool (before painting)
Here’s the more-or-less completed step stool… made from recycled inch-and-a-half pine boards from the rails of an old waterbed I bought in the Eighties…
I was unable to find a plan that was entirely to my liking and/or could be easily used with the wood I had, so I came up with this simple design myself.
Since it’s going to be painted, I elected to go with a very sophisticated screw-and-glue joinery technique (nyuk nyuk) and just fill the screw holes with wood filler. Waiting for the first application to dry at this point, then a final application of the filler, then sealer/primer coat, then plain white paint.
At some point Lynda will probably give it the tole-painting treatment, but plain white to start.
Walnut Bedside Table
Just a small project to use up the rest of the walnut left over from the TV table.
TV Stand Finally Done
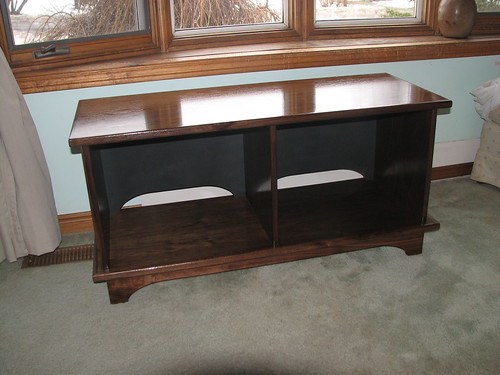
Well it’s been a long time coming, but the long-awaited TV stand is finally a reality… much as it pains me to use “reality” and “TV” in the same sentence.
It’s posing here under the living-room window to show off its shiny finish, but obviously this is not its final home. It needs to go into the corner, but not until I dismantle all the existing devices and make room for it… which I’m avoiding doing even as I type this.
The piece is made from walnut-veneered material, with solid walnut base, trim, and accents. It’s a pretty straightforward case design, employing biscuit joinery for the flat pieces, and just glue for the edge trim. The base is attached with pocket screws. During the design process, I decided that providing a shelf was not going to be necessary, based on our components that are going in here, it will be better to just stack them. If I change my mind again, it should be simple enough to add a shelf.
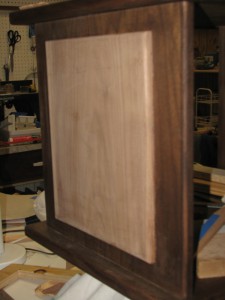
The piece had some walnut stain applied… long story… I noticed too late that there was some funky stuff going on with one of the side pieces, where the veneer was allowing the underlying particle board to show through. I attempted to fix this with stain, but this was not successful at hiding the problem. So what I came up with was to apply a flat panel of solid walnut to each side, left unstained to let it stand out as an accent piece. Looks okay, I think. I’m still worried that wood movement may cause the accent panels to become unstuck from the sides, but I’ll deal with that when and if…
I made the base with a pretty standard arched cutout to form “feet” at the corners. The base pieces are solid walnut, mitered at the corners, with the arch feature on all four pieces. When considering the back of the case, which is just 1/4″ hardboard painted black, I wanted to leave holes for ventilation at the top, and wires at the bottom. Rather than just drill the usual holes for this, I elected to repeat the arch detail of the base. I made four cutouts, two top and two bottom, to allow for feeding wires to both sides, and for air movement. You can only see the bottom ones in the photos.
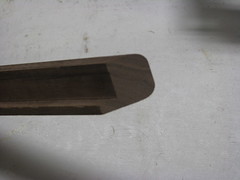 Finally, I should talk about the edge trim. It’s solid walnut, just with simple 1/4″ roundovers on the three vertical pieces, but for the top and bottom I wanted something a bit more substantial. By using a full one-inch piece, I was able to “wrap” it around the edge, providing way more glue surface, as well as support from underneath, making it safer to grab and lift the finished piece without the trim ripping off. And of course it gives the illusion that the top and bottom are themselves a full inch thick.
I’m just glad it’s done…
Am I Screwed?
With dawning horror, I realize I have made a probably fatal mistake, total rookie move, in the construction of my TV stand… in order to disguise some ugly defects in the walnut veneer of one of the side pieces (which I should have picked up on earlier in the process, another rookie move) I decided to cover it with a nice little panel of solid walnut.
Bob's Folly?
The problem is, it never even dawned on me to consider wood movement. I’m afraid the panel will expand across its width when summer humidity hits, and one day I’ll just find it on the floor, the glue bond broken. Or worse, damage will be done to the particle board making a repair impossible.
So my question is, should I just kill myself now, or wait for it to actually break. Or maybe even, is there something I can actually do about it…?? Any insights or public humiliations are welcome. (I’ve also posted this to the Sawmill Creek and Wood Whisperer Community forums, so I’m sure I’ll get told…)
Two Carbara Pens
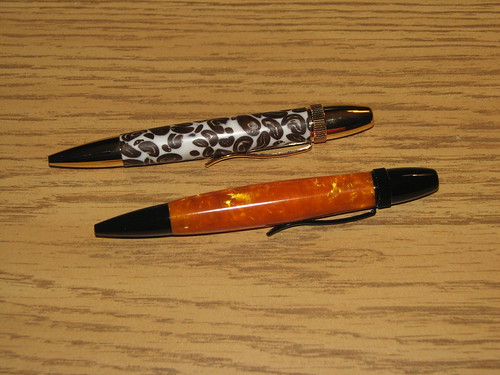
Two Carbara Pens, originally uploaded by rgdaniel.
Two new pens in a new format I’m trying, called “Carbara”. One is the coffee beans in white acrylic seen earlier in a standard slimline, and the other — just in time for Christmas — is my Halloween pen… orange acrylic with black chrome fittings…
These pens are a little shorter in overall length than the previous styles, but with lots of heft in the hand. Nice balance overall, not too heavy.
Miters Well
 Before I could continue working on the much anticipated TV stand (see artist’s rendering) I knew I had to make something else first. Not as a distraction or delaying tactic, though you might be forgiven for immediately suspecting that, but as a necessary step towards completing the project. I needed to build a miter sled. The exposed edges of the walnut-veneered particle board are to be covered with solid walnut trim pieces, which I have mostly milled and ready to cut to length. (Still deciding on final profile, I will probably do the round-over at the router table while I still can…
The idea of the miter sled is to allow the cutting of these trim pieces with sufficient accuracy that they will not show any gaps at the 45-degree joints at the corners. This is difficult using the standard table-saw miter guage.
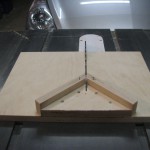 The first photo shows the finished sled, in place on the table saw. I used Baltic Birch Plywood for all the parts, because I just love the stuff and it’s perfect for this kind of thing. I only use Home Despot plywood for catching glue drips, or similar demeaning tasks that are all it’s good for…
The eagle-eyed will have noticed that my outfeed table is actually my wife’s Honda Fit. It’s at a bit of an awkward angle, but in its defense it does get great gas mileage…
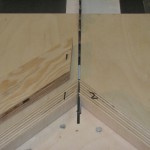 The reason for the numbers is as follows: rather than depend on the angle being a perfect 45 degrees, which is difficult to find in real life and prone to inaccuracy, the sled depends on the two angles being part of a perfect 90 degrees, which is found all over the shop… In this case, the factory corner of a piece of Baltic Birch Plywood (accept no substitutes) was found to be a perfect ninety, and formed the pointy bit on the sled, the bit with the very attractive visible screws. So long as you cut one half of the joint on one side, and the other half on the other side, you KNOW it’s going to add up to that perfect ninety. Or at least, I HOPED it would.
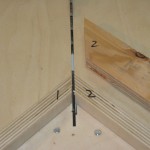 So I tested by cutting a piece of scrap (expendable Home Despot crappy plywood as it turns out) in half, then mitering one half on side #1 (left) and then the other half on side #2 (right). These should result in a perfect ninety-degree corner with no gaps.
Yay! Looks like it worked! Okay, no excuses, gotta get that trim glued on… Well, after I mill it to final profile…
Two Pens – African Spalted Stinkwood and Coffee Beans in White Acrylic

Two Pens – African Spalted Stinkwood and Coffee Beans in White Acrylic, originally uploaded by rgdaniel.
The stinkwood is quite subtle, but rewards deep gazing… like a burl almost… not sure how much actual spalting made it into the finished pen here…
The coffee bean pen is anything but subtle… actual coffee beans embedded in white acrylic… it’s actually not bad to work, compared to pure acrylic… the coffee beans just turn to powder, or to coffee grounds I guess… smells like Starbucks when you’re working it… but it leaves a lot of little voids, which need filling with crazy glue and the coffee powder… I missed a few here, but still, not too bad… The centre band is purpleheart.
I had two blanks, and cut them to length in preparation for a larger one-piece pen style I’ll be trying out next. The resulting two offcuts were just the right size to combine for this pen. Waste not, want not…
More Pens
These are available (i.e. not part of an order) Species include (l-r) curly maple (2), cherry (2), walnut (4) and a lone pau ferro on the right. Oddly, the four walnut pens are all quite different, despite coming from the same piece of wood and getting the same treatment… no two alike was never so true!!
Also introduced here for the first time… wire burns. This involves various thicknesses of instrument wire, held between pairs of wooden holders, pressed against the rotating piece to produce a burned-in black line detail. I think I like this best with two lines, as on the cherry pens.

